Critical Path Brewing

When not brewing, I work as an architect. While there is seemingly little cross-over between the two, both are analogous in their diverse blend of science and art. One thing my day job has brought to my brewday is the concept used in construction of critical path scheduling. While not the sexiest topic to talk about, it has given structure and efficiency to my brewdays.

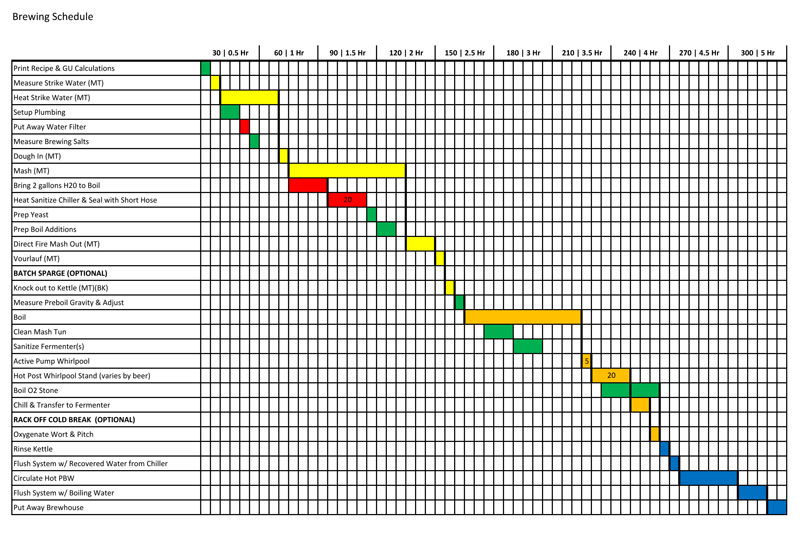
My Brewday Schedule - Critical Path Items are connected in the schedule using bold vertical lines. Non-critical tasks are taken care of while critical items are taking place.

My Brewday Schedule – Critical paths are connected in the schedule using bold vertical lines. Non-critical tasks are taken care of while critical paths are taking place.

In a nut shell, critical path scheduling dictates that your overall project (brewday) can never take less time than the sum of all critical paths (tasks) within the overall schedule. If your goal is to shorten your overall project, you must look at ways to shorten your critical paths. A critical path is essentially any task which must be completed before other critical paths can begin. In brewing, a common critical path would be mashing. You can’t start boiling (another critical path) until the critical path of mashing is complete. By looking at your brewday in this manner, it illustrates all of the other non-critical path items (cleaning, prepping items, putting away items, etc.) that can occur while critical path items are being completed. This methodology exposes areas of unused time during the brewday and allows you to be efficient with your time and decrease the time required to complete a brewday.

Geeky, yes, but it works. If you really want to geek out, you can download my Excel spreadsheet, here.

Whirlpool Hopping – Maiden BK Pale Ale

The Beer

Whirlpool After FlameoutWhirlpool hopping is a technique used in some of the best hoppy beers in the world. For those less-than-familiar with this technique, it is essentially equivalent to the ‘0 minute’ addition homebrewers use. In many professional breweries, kettles (or in some cases a separate whirlpool vessel) is used to spin the wort directly after flame out to collect trub and other particulate matter in the center of the vessel while drawing clear wort off of a side mounted port and sending it on the the heat exchanger and fermentation vessels. Somewhere along the line a brewer discovered that they could toss hops into the kettle during this process and create some very nice hop flavor and aroma.

There is little doubt among brewers that whirlpool hopping helps bring massive hop flavor and aroma to the finished beer. The big debate happens when you try to quantify the bitterness that is attributable to these additions. Some brewers (and pieces of brewing software) would imply that there is no isomerization of alpha acid at these less-than-boiling temperatures and therefore the amount of bitterness attributed to these additions is negligible. Others claim that it is equivalent to a 20 minute hop addition in terms of bitterness.

I tend to fall somewhere in between. To me, 20 minute addition equivalency makes the most sense in relation to brewing on a commercial scale. Many commercial breweries can take over an hour to knock out from kettle, through a heat exchanger, and into fermentation vessels. Large commercial kettles have a massive heat capacity that is much greater than what I’ve experienced on the homebrewery scale. Most homebrewers lose heat and knock out much more quickly than their commercial peers. It makes sense to me that since you’re keeping the wort hotter longer on the commercial side that you would get more isomerizaton of alpha acid than on the homebrewery scale. To test this, I devised a simple session pale ale that would use whirlpool hops almost exclusively. There is a small 60 minute charge that was designed mainly to prevent boil-overs and help with protein coagulation.

Maiden BK Pale Ale

Size: 3.0 gal

Original Gravity: 1.049
Terminal Gravity: 1.012
Color: 8.53
Alcohol: 4.84% ABV
Bitterness: 19.2 (calculated by Beer Tools).

Ingredients:
5.75 lb (78.6%) Pale Ale Malt – Rahr
1.5 lb (20.5%) Vienna Malt – Weyermann
1 oz (0.9%) Acidulated Malt (PH adjustment)
.25 oz (8.3%) Citra™ (14.1%) – added during boil, boiled 60 m (19.2 IBU)
1 Whirlfloc Tablet (Irish moss) – added during boil, boiled 15 m

.5 oz (16.7%) Simcoe® (13.2%) – whirlpool 30 minutes
1.75 oz (58.3%) Citra™ (14.1%) – whirlpool 30 minutes

WYeast 1056 American Ale

Mash 155 °F
Ferment: 66 °F

The Tasting

Maiden BK Pale AleThere is little doubt in my mind that this beer is more bitter than the 19 IBUs Beer Tools estimates it to have. There is a considerable, but smooth bitterness that balances quite nicely with the malt. Beer Tools calculates this to be a whopping 145 IBUs if I assign the whirlpool hops the same utilization as a 20 minute addition. If I calculate it as a 10 minute addition, it calculates out to 92 IBUs. If I calculate the whirlpool hops as a 5 minute addition it puts the total at 58 IBUs. I would estimate the bitterness in this beer to be between 50 and 60 IBUs, so according to Beer Tools it is roughly equivalent to a 5 minute boil addition. Of course, there are so many variables involved that it is tough to transfer this logic to other beers. That being said, it unequivocally proves to me that whirlpool hopping contributes a significant bitterness to beers which cannot be ignored in recipe formulation.

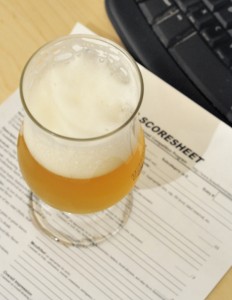
Judged as a BJCP category 10A American Pale Ale.

Aroma (5/12)
Big hop aromas of mango, tangerine, along with pineapple jump from the glass. I could  swear that this beer was dryhopped had I not known better. The giveaway is that there is none of the grassiness typically attributed to dry hops. There is a hint of honey-like malt sweetness which compliments a low toasty malt note. There is a bit of a distracting butterscotch aroma. It doesn’t present in the traditional ways I’ve perceived diacetyl, but it is certainly a possibility.

Appearance (2/3)
Golden with a light haze. Big white head. Some of the best head retention and lacing I’ve ever seen. I suspect this is due to the large hop charge in the whirlpool. Too light in color for the style.

Flavor (13/20)
Hop flavor dominates. Lots of sweet orange peel that combines with the butterscotch perceived on the nose giving it a sweet impression. The malt is crisp and clean. The toasty Vienna notes are slight and not as strong as I would have anticipated. Bitterness is moderate and balanced. Could use a slightly coarser bitterness to better fit as an American Pale Ale.

Mouthfeel (4/5)
Medium body with a clean crisp finish. Bright and lively carbonation.

Overall Impression (5/10)
This is a nice bright sessionable pale ale. Hops are dominate and could use a little more diverse malt character to better fit the category. The malt is crisp, yet one dimensional. The distracting hint of butterscotch could be diacetyl, although it doesn’t quite present like any diacetyl I’ve tasted before. I suspect that if it is diacetyl it was due to pitching and fermenting too cold and then dropping the temperature of the ferment before the yeast had finished metabolizing all fermentation byproducts. I would like to brew this beer again, paying more careful attention to yeast health, bumping up the bitterness, and perhaps giving it a touch more malt diversity. In the end however, it is a very sessionable and balanced pale ale.

Total: 29/50 (Good)

Back in the Brew House Again

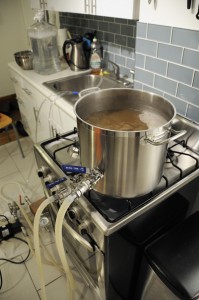
When I first got into brewing, I started small and simple. Very little process control was in place, the equipment was basic and easy to use, and the beer turned out… okay. As time went on, my brewery grew organically to include more and more pieces of specialized equipment whose purposes varied, but generally involved making brewdays easier or giving me a greater degree of control over the process. This is a pretty typical evolution that homebrewers go through, and something that offers the opportunity for your brewhouse to grow in sync with your brewing skills.

After relocating to Brooklyn, I took the opposite approach. Instead of organic growth, I preplanned my system on paper, acquired my parts, and then built-out the brewery over the course of several evenings. This was an exciting and daunting task; not something I’d recommend for someone just learning how to brew.

Acquisition of Parts and Build-Out

For what seemed like weeks, strange and wonderful pieces of stainless steel began arriving at my apartment. Thanks to the folks from places like Bargain Fittings, More Beer, and Williams Brewing, finding the parts I needed was fairly easy. The most difficult item to track down was a thick walled stainless steel kettle with a multi layered bottom in a 5-gallon format. Unfortunately, most 5-gallon kettles are designed for entry level or partial boil extract brewers. I wanted something sturdy that would provide better heat dispersion and retention. I ended up with a great little kettle from Midwest Brewing that fit the bill perfectly.

The actual build-out went simply enough. It was important to diagrammatically layout how all the components were fitted out in order to procure the right fittings, but also have a pseudo installation manual for building. From there, piecing together the components was rather easy and happened quickly. The most difficult task was using a step-bit to place holes into my thick walled kettle. My cordless drill was barely up to the task. It took multiple trials and battery charges, but in the end I successfully placed two holes into my kettle’s walls. Lubricant is your friend when drilling (yes, I said that) and keeps the bit cool while cutting through the kettle walls.

The Build-Out:

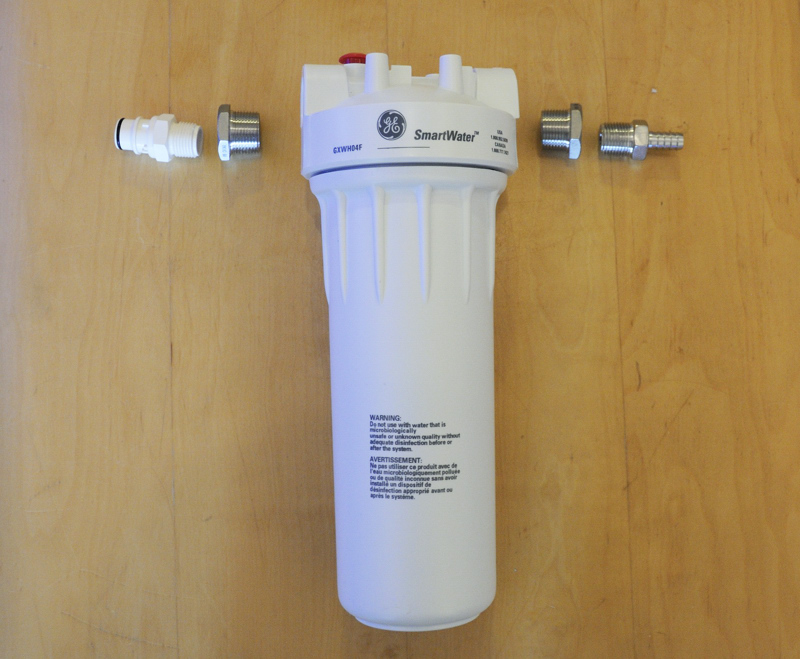
Ready to be assembled.

GE water filter ready to be assembled. There isn’t much chlorine in NYC water, but the filter is a relatively easy way to provide some piece of mind.

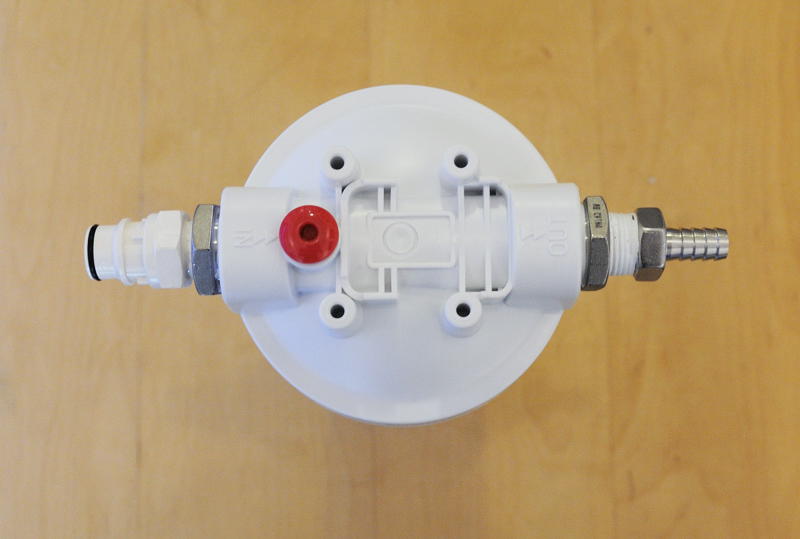
GE water filter with quick disconnects allows me to quickly fill my kettle with filtered water. Thread onto kitchen faucet.

Quick disconnects allow me to quickly fill my kettle with filtered water. The plastic quick disconnect inlet snaps onto a hose with a threaded adapter for my kitchen faucet. The same hose is used later in the process to connect to the inlet on my my plate chiller. The barbed outlet connects to a hose used to fill my mashtun with strike water.

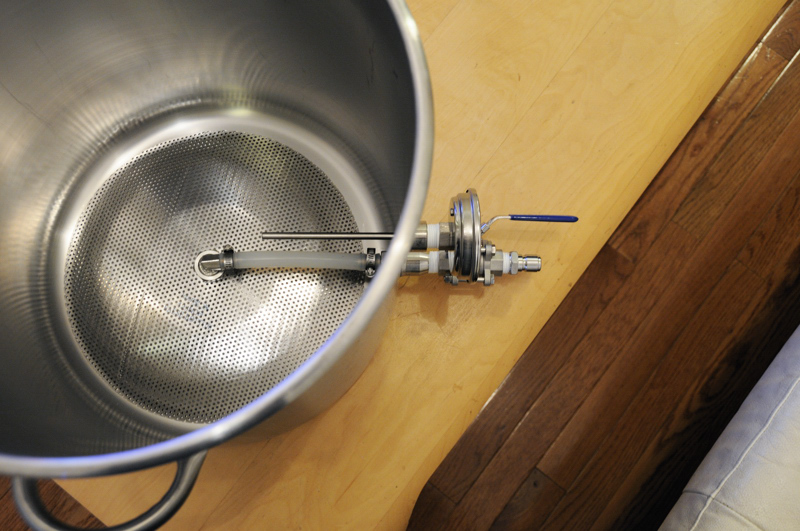
42 quart Polarware mashtun with stainless steel false bottom, 3-peice ball valve with quick disconnect, and thermometer.

42 quart Polarware mashtun with stainless steel false bottom, 3-piece ball valve with quick disconnect, and thermometer. Strike water is directly fired in the mashtun.

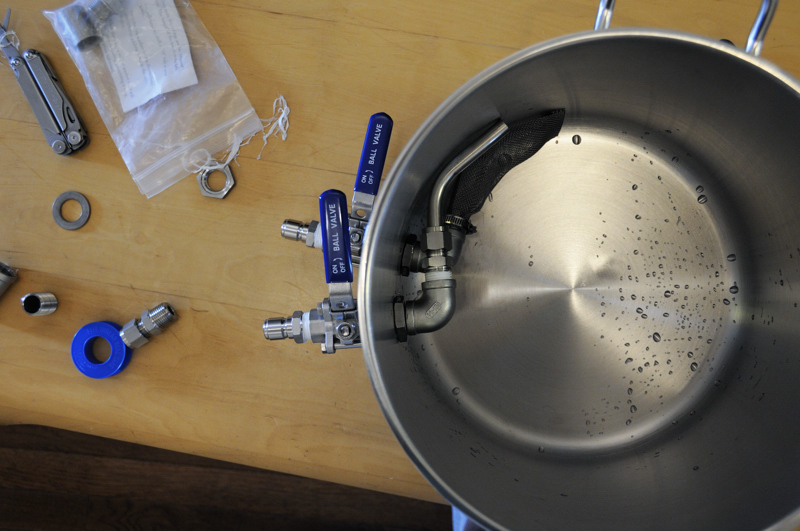
My 5-gallon kettle was installed with an outlet and tangential inlet for whirlpool purposes. All equipment is fitted out with male stainless steel quick disconnects. All hoses are fitted with female stainless quick disconnects. This allows for maximum flexibility when chaining together equipment.

My 5-gallon kettle was installed with an outlet and tangential inlet for whirlpool purposes. Both bulkheads are fitted with 3-piece ball valves allowing for complete disassembly and cleaning. All equipment is fitted out with male stainless steel quick disconnects. All hoses are fitted with female stainless quick disconnects. This allows for maximum flexibility when chaining together equipment. The kettle screen on the outlet valve was a flawed design on my part and has since been removed due to excessive clogging. I know use a simple 90 degree elbow for the pickup and use hop bags to contain most hop material.

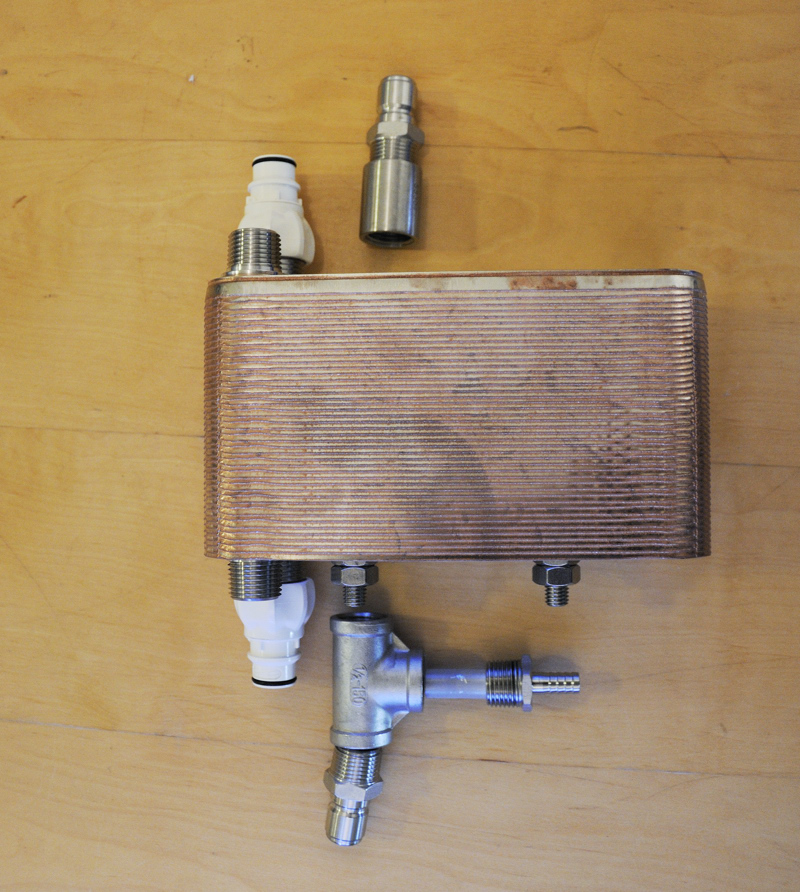
Individual fittings ready to go together.

Blichmann Therminator with individual fittings laid out and ready to go together.

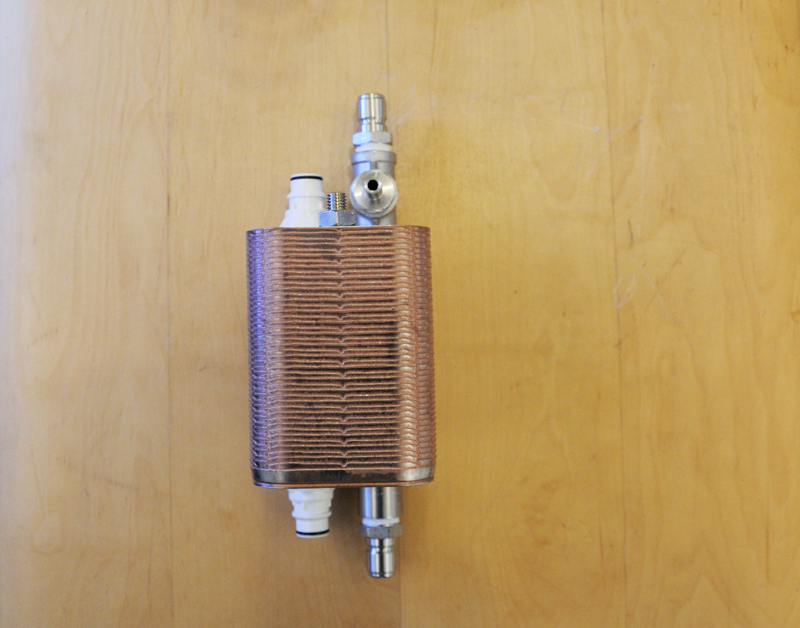
Fitted out with plastic quick disconnects on the water side and stainless quick disconnects on the wort side. I iniatially installed an inline O2 stone which has since been removed due to excessive foaming and concerns about sanitation.

Fitted out with plastic quick disconnects on the water side and stainless quick disconnects on the wort side. I initially installed an inline O2 stone which has since been removed due to excessive foaming and concerns about sanitation.

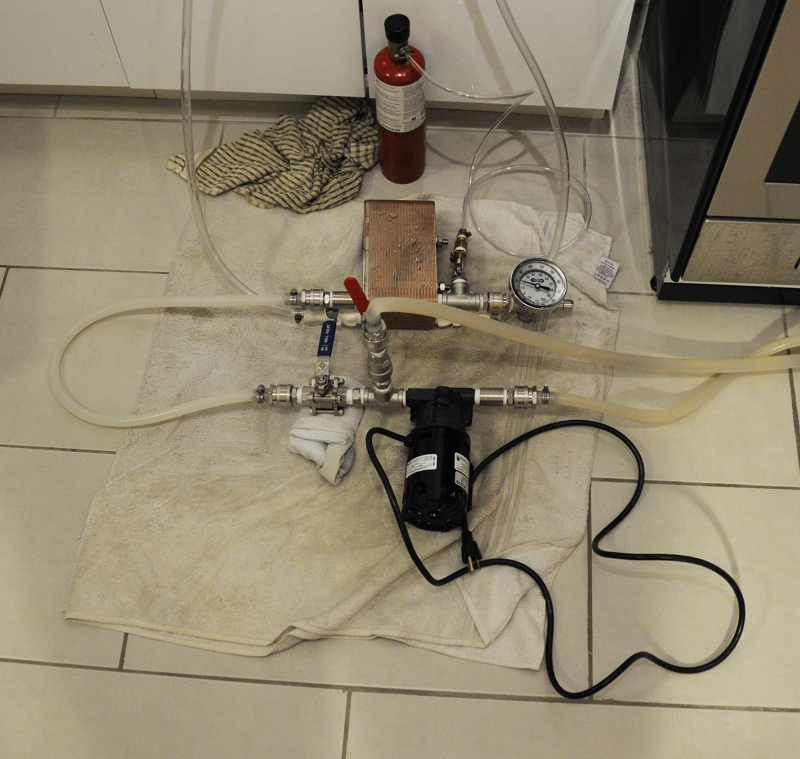
March Pump and fittings. I've installed the output side of the pump with two circuits. One can go straight back to the kettle for whirlpooling. The other circuit goes to the plate chiller and back to the kettle.

March Pump and fittings. I’ve installed the output side of the pump with two circuits for hot liquid. One can go straight back to the kettle for whirlpooling. The other circuit goes to the plate chiller and on to the fermenter. An inline thermometer on the plate chiller outlet tells me the temperature of wort heading to my fermenter.

Building The Pour Report’s Brooklyn Brewery – Pre Design

Seven months have passed since I moved cross country to Brooklyn. Life has a way of getting in the way of hobbies and my new brewery build was shifted to the back burner. Luckily, things are looking up. New equipment has been ordered and my first Brooklyn batch is only a couple weeks out.

Home brewery design has been on my mind a lot. Sizing components, designing wort transfer processes, handling the logistics of boiling on a puny stove and thinking about the items I’d change from my original brewery have been integral to my new brewery’s design. Among things that I wanted to implement in the new design:

  1. Pump transfers of liquid. No more lifting heavy (and hot) vessels.
  2. Use a plate chiller to increase cooling efficiency. Plumb vessels and pump to allow circulation back into kettle post-chill in order to utilize a whirlpool and minimize cold break from getting into the fermenter. It doesn’t appear many people are doing this, and I may abandon the process it if it proves to have little benefit.
  3. Create a tangential inlet into the kettle to allow for effective whirlpools.
  4. Use stainless steel quick disconnects throughout — because they’re cool.
  5. Plan for easy future integration of a RIMS tube w/ PID controller.
  6. Plan for easy future integration of a hop back.
  7. Build the brewery around the smaller volumes that fit the type of brewer I am.
  8. Use an electric heat element to jump start boils. Don’t electrocute myself.

Paramount to my brewery’s design is the volume of the various vessels. It is important to appropriately size my new brewery for the typical volumes and specific gravities I intend to use it for. By analyzing my own personal brewing interests, I’ve come up with the following typical brew lengths which can be used to size my equipment.

Typical Brew Lengths

  1. The Daily Drinker – 3 gallons (post boil) up to 1.080 original gravity.
    Easily packaged in a 3 gallon corny keg and served on draft. Typical brew length.
  2. Experimental Split Batches – 2.5 gallons (post boil) up to 1.120 original gravity.
    The perfect volume for experimentation. Easily split into secondary 1 gallon glass vessels for different treatments. Capable of producing very high gravity wort.
  3. Recipe Development Batches – 1.5 gallons (post boil) up to 1.120 original gravity.
    I get most of my enjoyment from the brewing process and learning about the implications recipe and process design have on the final batch. This batch size and gravity allows for frequent brewdays and flexibility.

Vessel Sizing

The vessels I’ve put into my brewery are designed around the gravity and volume of the typical brew lengths. Of the above scenarios, the ‘Experimental Split Batches’ has the highest gravity demands and thus dictates the mash tun sizing. The calculations showing the mash tun size requirements are below.

Constants Used for Calculations
70% efficiency (batch sparge)
60% efficiency (no sparge)

Mash Thickness: 1.25 qt. / pound water (batch sparge)
Mash Thickness: 2.25 qt. / pound water (no sparge)

35 Gravity Units per Pound of Malt
1 lb grain = 0.32 quarts (volume)
0.15 gallon / pound (grain water absorption)

Sizing Calculations

Experimental Split Batches:
2.5 Gallons @ 1.120 Original Gravity

2.5 x 120 = 300 Gravity Units

Mash Volume Calculation (Batch Sparge):
300 GUs  / 35 PPG / 0.7 (efficiency) = 12.24 lbs grain = 3.92 qt. = 0.98 gallons
3.825 gallons Strike Water @ 1.25 qt/lb

Total mash volume: 4.8 gallons

Mash Volume Calculation (No Sparge):
300 GUs  / 35 PPG / 0.6 (efficiency) = 14.28 lbs grain = 4.57 qt. = 1.14 gallons
8.03 gallons Strike Water @ 2.25 qt/lb

Total mash volume: 9.17 gallons
Kettle volume = 8.03 (strike volume) – 2.14 (grain absorption) – 0.5 (dead space) = 5.39 gallons

Mash Tun Size

Of the brew length typologies above, the ‘Experimental Split Batch’ (batch sparge) requires the largest volume mash tun (9.17 gallons). At the last NHC I won a 42 quart Polar Ware stainless steel kettle which should work well as a mash tun once it is insulated. It is stainless steel which will allows me to heat my strike water directly in the mashtun, and possibly do some direct fired mashes with the aid of a pump and stirring action. This is a large mash tun and will likely be problematic for extremely small batches. My plan is to design my hot liquor tank with valves, a false bottom, and insulation so that it may be used as an alternative mash tun for small batches.

Hot Liquor Tank Size

Strike water will be directly heated in the mashtun. When batch sparging, a separate 3-gallon vessel will be used to heat sparge water.

Kettle Size

My maximum batch size is 3 gallons. If these batches start with 3.5-4 gallons of volume  pre-boil, I should be able to use a 5-gallon boil kettle. For batches requiring very high gravities, I will likely run off more wort than can fit in this kettle and boil for long periods. In this case, I will likely split the boil into multiple vessels.

For my next post, I’ll photograph the brewery’s test run and breakdown the parts and processes designed into the brewery. In the meantime, check out the sketches of the brewery’s main components used to determine how everything connects and works together.
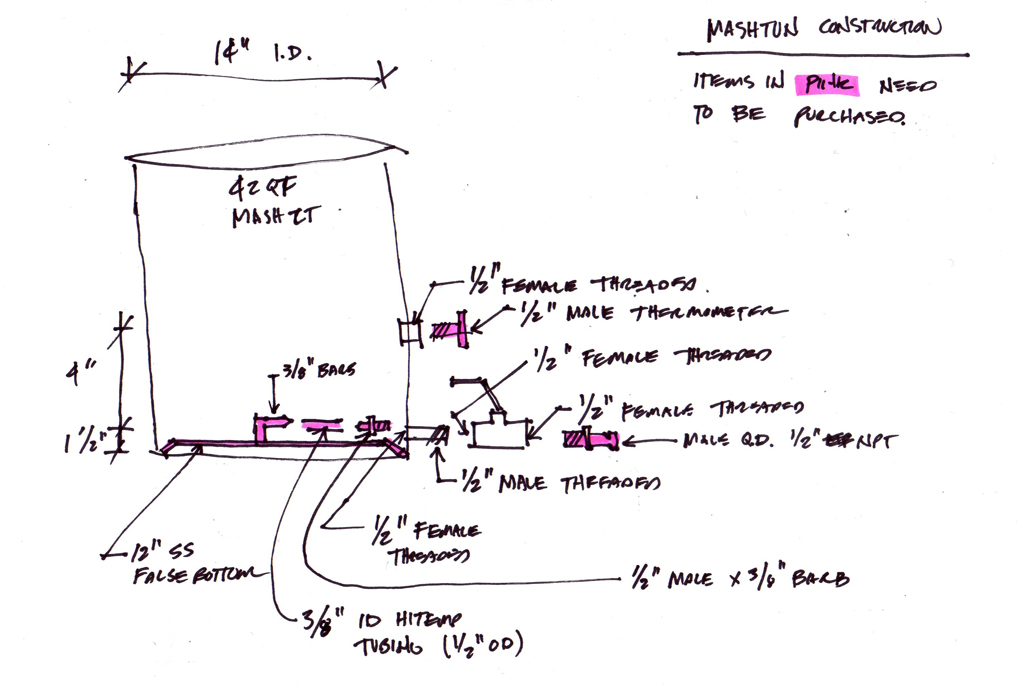
42 Quart Stainless Steel Mashtun. Features SS false bottom, ported thermometer, and SS quick disconnects.

Mash: 42 quart stainless steel mash tun. Features SS false bottom, ported thermometer, and stainless steel quick disconnects.
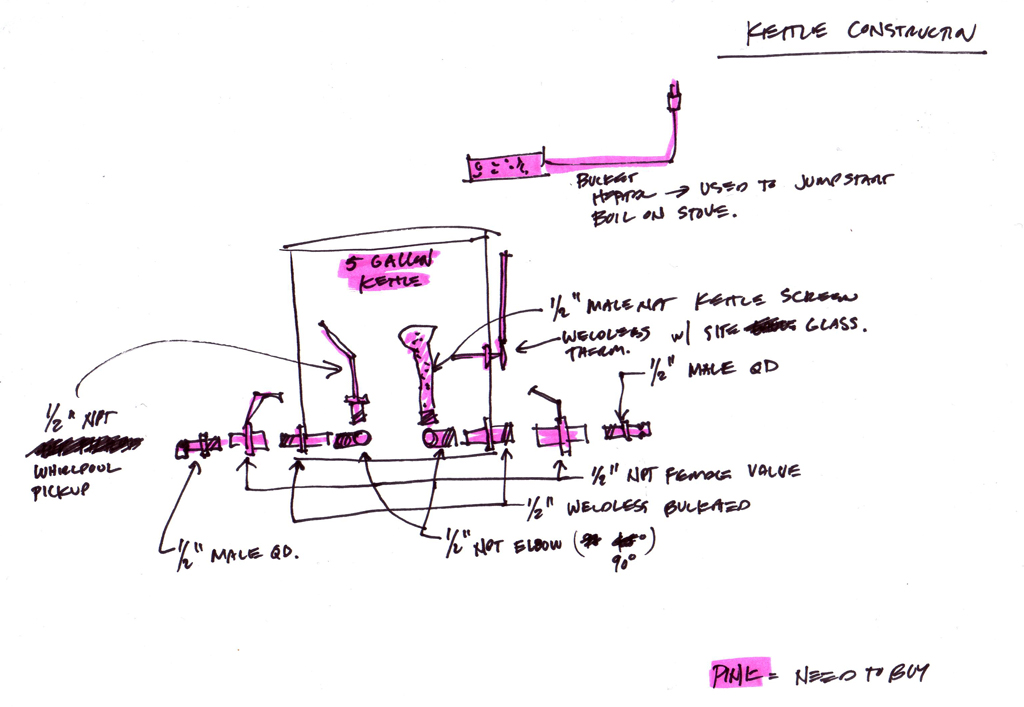
5-Gallon stainless steel kettle. Features two liquid ports (one out and one in for whirlpool functions), a sight glass with thermometer, and additional heat supply via a bucket heater.

Boil: 5-Gallon stainless steel kettle. Features two liquid ports (one ‘out’ and one ‘in’ for whirlpool functionality), a sight glass with thermometer, and supplemental heat source via a bucket heater.
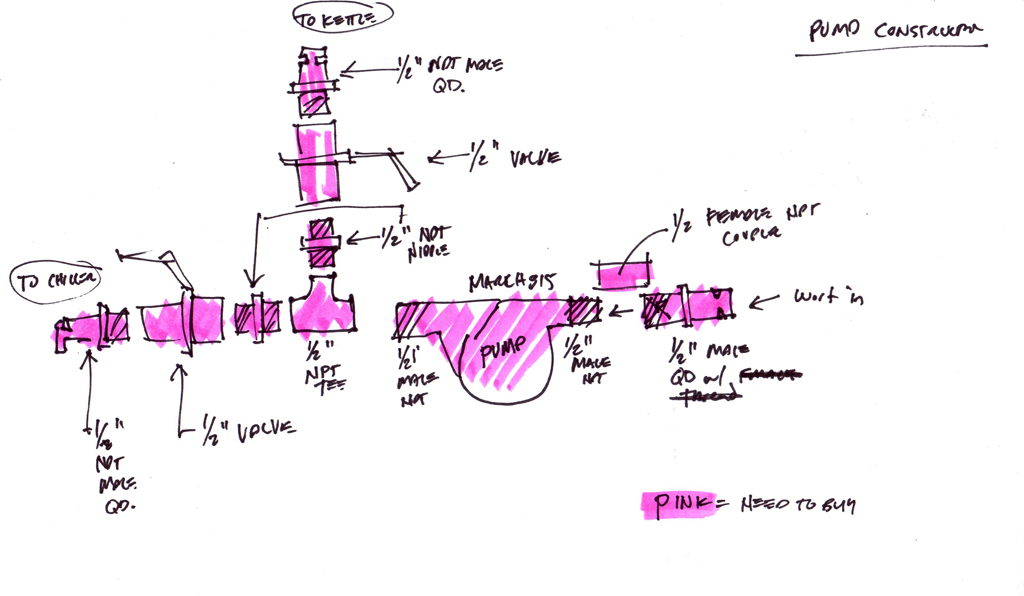
March pump with stainless steel quick disconnects. There is a tee with valves allowing recirculating directly into kettle or through the plate chiller that is attached in series.

Wort Transfer: March pump with stainless steel quick disconnects. There is a tee with valves allowing for recirculation directly into kettle or through the plate chiller that is attached in series.
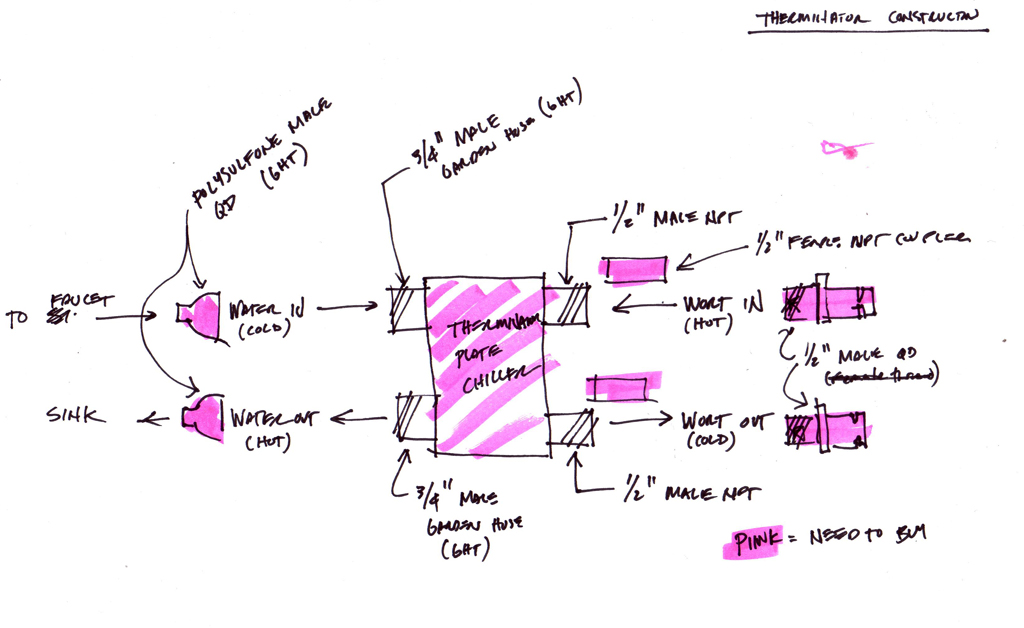
Plate chiller with appropriate stainless steel quick disconnect fittings.

Chill: Plate chiller with appropriate stainless steel quick disconnect fittings. Polysulfone quick discounts connect the chiller to my cold water source (my kitchen faucet).
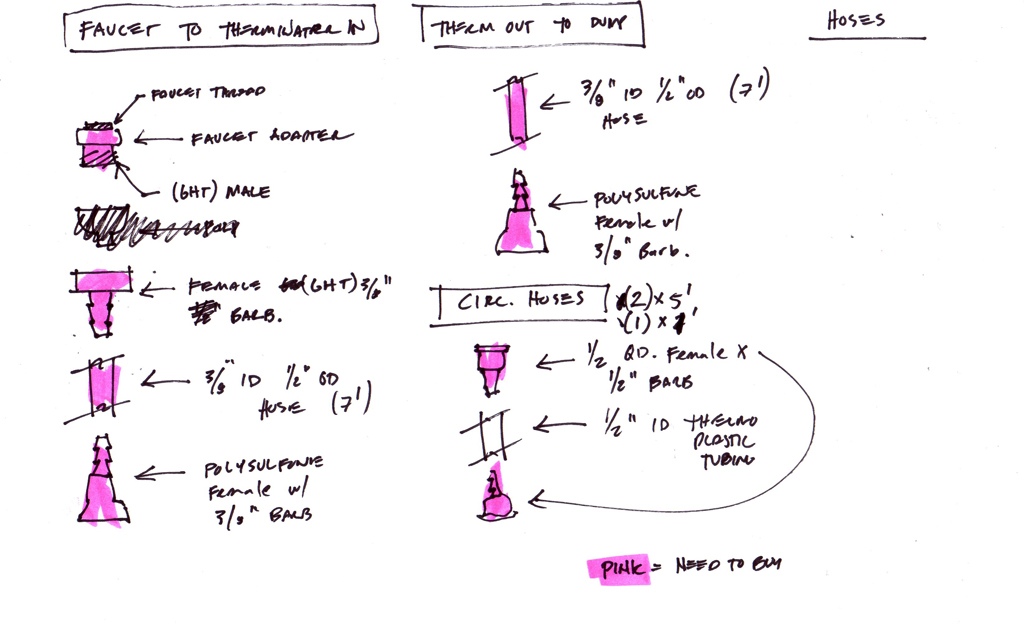
All hoses are designed with appropriate food safe thermo-plastics and stainless steel quick disconnects where possible.
All hoses are designed with appropriate food safe thermo-plastics and stainless steel quick disconnects where possible.

New Belgium / Alpine Super IPA Review

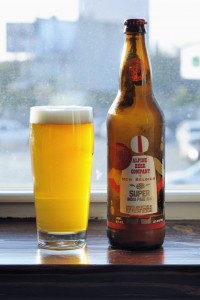
New Belgium / Alpine Super IPA

New Belgium / Alpine Super IPA

The nature of the craft beer movement encourages trends. Currently, it seems that collaboration beers are all the rage. Stone does it all the time (even with homebrewers) as does Russian River, Deschutes, Hair of the Dog, and many of the greatest breweries in the country. Super IPA is a collaboration between one of the biggest craft brewers (New Belgium) and one of the smallest and most sought after (Alpine Beer Co.). At first glance, this seems like an amazing opportunity for a small and critically-acclaimed brewery to get distribution well-beyond their typical geographical influence. Unfortunately, while quaffable, this beer misses on many marks which would have made it amazing.

Beer Data:

Purchased: 10/5/12 at Whole Foods P Street, Washington DC
Consumed: 10/7/12
Bottled: No decipherable date on bottle
Alcohol: 9% ABV

Commercial Description from Website:

The Alpine Beer Co. and New Belgium have come together for the love of IPAs. This collaboration is hop-wonderful with Amarillo, Columbus, Simcoe and Centennial hops, bringing the bitter all the way to the front. A nice balance is present with Pale, C-80 and Carapils malts, but the tropical and citrus tones of the American hops dominate. This Super IPA pours a sheened copper and carries a bright, white head. Consider yourself a hero for getting an  Alpine beer outside of San Diego.

Tasting Notes:

Aroma: Big green grassy raw hop aroma. Hops are quite resinous and herbal. This beer is dominated by Columbus hops, which are very rough around the edges. There are some nice mango and tropical fruit notes which seem bullied by the heavy piney and grassy characters. Little to no malt aromas are present on the nose; quite characteristic of Alpine’s other offerings. This beer smells like homebrewed beers I’ve had that sat too long on the dry hop. 5 / 12

Appearance: Very light copper bordering on golden. Off-white head with great retention. Clear, but not crystal clear. 3 / 3

Flavor: Big grassy raw hop flavor. Lots of resin on the palette. The flavor is pretty one-dimensional and dominated by the grassy / herbal hop flavor. There is a very light sweetness / honey character to the malt, but it is by no means easily perceived. This is a very smooth beer whose bitterness is quite low for the style, but balances with the dryness of the beer. This is where I see Alpine’s biggest influence.  11 / 20

Mouth Feel: Medium / medium low body. Average carbonation. Some astringency reminiscent of chewing on a raw hop pellet. 4 / 5

Overall Impression: Alpine is known for producing over-the-top hoppy beers with huge tropical fruit flavors and very lean malt profiles. I feel like this beer tried to hit those notes, but fell short in the hop selection arena. I can’t help but think that perhaps the need to produce New Belgium scale quantities of this beer forced the hand of the brewers into compromising on their hop selection; using massive quantities of Columbus hops which come off harsh, grassy and herbal in this beer rather than the more tropical varietals like Amarillo and Simcoe listed on New Belgium’s website. The malt is perfectly in line with Alpine’s tradition; dry and lean which would set the stage perfectly for a cleaner, fruitier hop experience. Unfortunately, this is where it falls short. 5 / 10

Score: 28 / 50 (Good)

Note: Evaluation done according to BJCP Scoring System. This beer was reviewed as a Category 14c. Imperial IPA.