100% Sour Mash Berliner Weisse Tasting

Less than a week after pitching yeast, my Berliner Weisse was carbonated and ready for consumption. The beer finished just in time for the NYC Homebrewers Guild annual picnic and the intense NYC heat (and humidity) wave that followed shortly afterwards. I couldn’t have made a beer in a more timely manner. At only 3.4% ABV, I was able to push it from grain to glass faster than any other beer I’ve brewed.

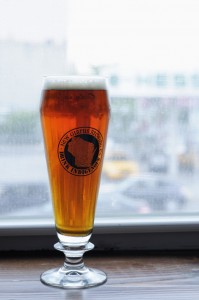
100% Sour Mash Berline Weisse

Perhaps the best beer to consume during the doldrums of a NYC heat wave?

Beer Tasting

Judged as a BJCP Category 17A Berliner Weisse.

Aroma (10/12)
Initially the beer presents with a nice and clean, tangy lactic aroma that is in some ways reminiscent of the acidity found in yogurt. In the background is a round and almost honey-like pilsner malt aroma with a hint of toasted cracker. Also apparent is a very light herbal hop aroma that is a bit out of place in the style, but welcome in such a young beer. There is a light touch of a pear ester. No diacetyl, DMS, or other off-flavors.

Appearance (3/3)
Quite hazy and very pale. There is a bright white foam that easily builds and persists throughout consumption.

Flavor (16/20)
Simple and delicious. The beer somehow manages to have an acidity that is both round and soft, while also quite intense and refreshing. The acid is clean and pleasant. There is a nice simple and easy-drinking malty character that showcases the pilsner malt sweetness while having a crisply dry crackery finish (probably from the wheat). None of the hops I got on the nose can be tasted. The malt is maybe a hair too sweet for the style. There is just a hint of perceptible bitterness.

Mouthfeel (4/5)
The dryness of this beer combines with the acidity and medium-high carbonation to be quite crisp. The body is maybe a touch full. There is no hint of thinness or the watery character that is often found in low-alcohol beers.

Overall Impression (8/10)
This is an excellent example of the style. It captures the acidity and refreshing qualities that are the hallmark of the style and hits all the right marks in terms of malt character. There are none of the off-flavors sometimes associated with sour mashes. The only detractor is that perhaps it is a touch sweet; likely caused by me undershooting my attenuation goals. To make this beer better, I would allow it to ferment for an extra day or two and hopefully squeeze a couple more points of  attenuation out of it.

Total: 41/50 (Excellent)

Berliner Weisse Recipe (Sour Mash) and Brewday

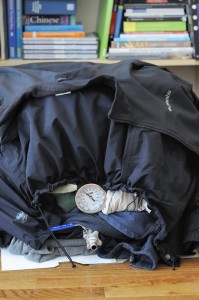
Using blankets and coats to insulate my mashtun.

Using blankets and coats to insulate my mashtun.

I love sour beer. I love simple beers. I love Berliner Weisse.

Berliners are low in alcohol and crisp, featuring a clean lactic sour character that can be quite tart and thirst quenching. They are easy drinking and sessionable. The best ones have an almost yogurt-like tartness produced by a lactic fermentation and complemented by a light and almost crackery wheat malt character.

The key to this Berliner recipe is creating a clean and substantial tart sourness using sour mash techniques. The beauty of a sour mash is that you don’t have to grow potential contaminants on the cold side of your brewhouse. The basic process involves mashing as you typically would and then post conversion inoculating the mash with a portion of raw grain (some inoculate with a commercial lacto pitch). The mash is allowed to naturally sour before boiling, chilling, and pitching yeast. Successfully sour mashing is all about setting the right environment for naturally occurring lactobacillus on the grain to thrive while discouraging other microbial action (molds, other bacteria, wild yeast, etc.). While researching sour mash, I ran into a lot of sources describing the putrid aromas that they can sometimes produce. Descriptors like gym socks, rotten vegetables, stinky cheese, and baby diaper are common when sour mashes are poorly executed, and are completely avoidable. By manipulating pH, temperature, and exposure to oxygen you can encourage clean lactobacillus growth while minimizing the growth of unwanted organisms.

pH – My recipe includes a large charge of acidulated malt, post sugar conversion, used to drop the mash pH into a range that lactobacillus can thrive at, but unwanted organisms do not.

Heat – My recipe inoculates the sour mash at the upper end of the temperature range that lactobacillus can thrive (126° F) and keeps the mash hot for 48 hours, using care to not allow the mash temp to drop below 106° F.

Oxygen – Lactobacillus thrives in anaerobic environments, while other organisms that throw off-flavors are aerobic. In order to encourage lacto fermentation, it is important to purge the mash tun using CO2 and seal it in order to prevent oxygen exposure. Additionally, I used de-aerated water (boiled) to mash with and was careful to not excessively stir the mash.

Recipe

Size: 3.24 gal
Efficiency: 76% (measured)
Attenuation: 72% (measured)
Boil Length: 30 minutes

Original Gravity: 1.036 (measured)
Terminal Gravity: 1.010 (measured)
Color: 3.03 SRM
Alcohol: 3.4% ABV (calculated)
Bitterness: 5.0 IBUs

Ingredients:
2.5 lb (52.6%) Bohemian Pilsner Malt
1.75 lb (36.8%) White Wheat
2 oz (2.6%) Acidulated Malt (for mash pH correction)
6 oz (7.9%) Acidulated Malt (added during 156° F rest to acidify sour mash post sugar conversion)
0.25 lb (0.0%) Rice Hulls (added during lauter)

8 g (100.0%) Hallertauer Hersbrucker (4.3%) – boiled 30 m
0.5 ea Whirlfloc Tablets (Irish moss) – boiled 15 m
0.5 tsp Wyeast Nutrient – boiled 10 m

1 ea WYeast 1007 German Ale™

Mash:
60 min – Rest at 148 °F
10 min – Rest at 156 °F
10 min – Mashout at 168 °F

Sour Mash:
1. De-aerate mash strike water by boiling.
2. Cool mash water to strike temperature.
3. Complete mash regiment and let it cool in mash tun to 126°F. Minimize stirring and aeration of wort.
4. Add 4 oz uncrushed pilsner malt to inoculate wort.
5. Cover mash bed with aluminum foil, purge with CO2, and seal mashtun.
6. Wrap mash tun in blankets and rest 48 hours.
7. Add boiling H2O to increase sour mash temp as required.

Brew Day:
1. Mash out grain bed.
2. Lauter
3. Boil, chill, and pitch yeast.

Yeast Pitch:
Final Volume into Fermenter = 2.75 Gallons
Yeast Required = 68 billion (per Mr. Malty)
Yeast Production Date: 6/11/13
Yeast Starter = (None Required)

Fermentation:
1. Chill to 64° F and keep at 64° F until activity slows.
2. Raise temp to 68° F until activity is complete.
3. Crash to 32° F for 36 hours.
4. Keg and force carbonate to 3 volumes CO2.

Brewing Notes:
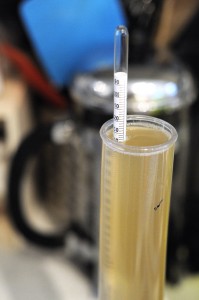
Gravity Reading - Post boil the wort is quite tart.

Gravity Reading – Post boil the wort is quite tart.

– Originally I was shooting for a 1.035 OG using an anticipated efficiency of 68%. My mash efficiency was considerably greater hitting 76%. I adjusted my final volume and interrelated hop additions in order to achieve an original gravity of 1.036.

– After sour mashing for 24 hours I tasted the mash liquid. It was barely tart, but quite clean with no off-flavors. Mash liquid was tasted again after 48 hours and had a substantial clean sourness with no off-flavors.

– My goal was to sour mash for 48 hours, brew, and then have a carbonated keg to serve 7 days later. I did this successfully, serving the carbonated beer less than 7 days from when I pitched my yeast. I rushed my fermentation likely causing the yeast to attenuate to only 1.010. I was hoping for 1.007 (80% apparent attenuation). Had I given the yeast another 2-3 days to work, I believe I would have achieved a 1.007 terminal gravity.

Vienna Lager Recipe and Tasting

Vienna Lager

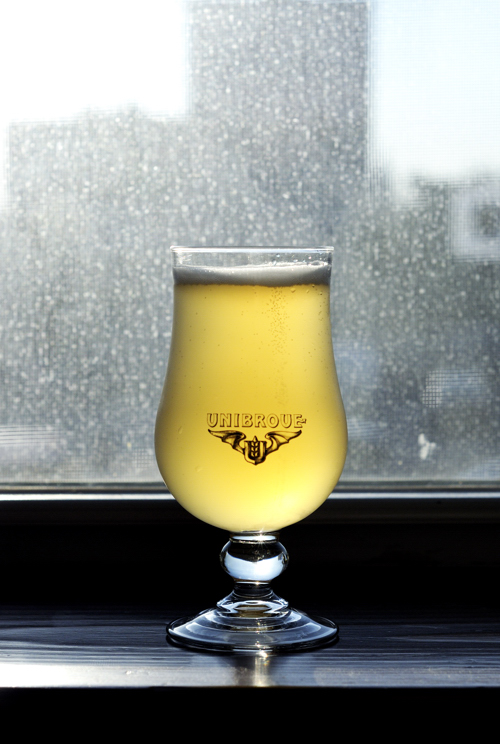
Homebrewed Vienna Lager

What qualities would you want in a “desert island beer”? Personally, I’d want something with low enough alcohol to consume in quantity, something relatively dry with some malt intrigue, and something balanced; in other words, a Vienna Lager.

The Vienna Lager is a bit of an enigma. The classic Continental examples are pretty much extinct. I have yet to find a European version that matches what I imagine a classic Vienna Lager to be. Immigration of Austrian brewers to Mexico in the late 1800’s brought the style to the New World, creating the distant relatives of the modern beers we see imported today. Common examples like Dos Equis Amber and Negra Modelo (which are tasty in their own right), are adjunct laden, sweeter versions of their Austrian forefather’s beer. The best examples today come from American craft brewers. Places like Chuckanut Brewing and Devil’s Backbone make my favorites and are perennial award winners at the GABF. These incredible all-malt examples have a slight sweetness and complex, yet not overbearing malt character, finishing slightly off-dry. This is what I’ve tried to emulate; using a recipe that takes a similar approach as Brewing Classic Styles, blending the trifecta of Pilsner, Munich, and Vienna malts. I personally don’t feel like crystal malts have much place in a good Vienna Lager; perhaps a touch for head retention. If you’re at NHC 2013 in Philly, come by the NYC Homebrewers Guild booth during Club Night where I’ll have this beer flowing.

Recipe

Size: 3.25 gal
Efficiency: 67%
Attenuation: 72%

Original Gravity: 1.050
Terminal Gravity: 1.014
Color: 14.23
Alcohol: 4.7%
Bitterness: 24.8

Ingredients:
2.625 lb (39.3%) Vienna Malt – added during mash
1.25 lb (18.7%) Pilsner Malt – added during mash
2.625 lb (39.3%) Munich TYPE II – added during mash
1 oz (0.9%) Carafa® TYPE II – added during mash
2 oz (1.9%) Melanoidin Malt – added during mash
1 oz (100.0%) Hallertauer Hersbrucker (4.3%) – added during boil, boiled 60 m
0.5 ea Whirlfloc Tablets (Irish moss) – added during boil, boiled 15 m
0.5 tsp Wyeast Nutrient – added during boil, boiled 10 m
1 ea WYeast 2308 Munich Lager™

Schedule:
00:03:00 Dough In – Liquor: 5.6 gal; Strike: 159.87 °F; Target: 155 °F
01:03:00 Saccarification Rest – Rest: 60 m; Final: 155.0 °F
01:13:38 Mash Out – Heat: 10.6 m; Target: 168.0 °F
01:18:38 Transfer to Kettle – Volume: 6.04 gal; Final: 168.0 °F
(No Sparge)

Notes:
Final Volume into Fermenter: 2.75 Gallons
Yeast Required: 196 billion (per Mr. Malty)
Yeast Production Date: 3/13/13
Yeast Starter: 1.6L @ 1.040 on stir plate (per Mr. Malty) = 6.5 oz. DME

Fermentation:
1. Chill to 44* F and keep at 48* F until activity slows (1 week+).
2. Raise to 58* F for diacetyl rest 24 hours .
3. Drop temperature 2 * / day until at 34 * F.
4. Rack to corny keg.
5. Lager 4-6 weeks

Tasting Notes:

Judged as a BJCP category 3A Vienna Lager.

Aroma (11/12)
Subtlety complex toasted malt character with some biscuit and almost sourdough-like bread qualities. There is a hint of sweetness on the nose. Just a whisper of sulfur reminds you you’re drinking a lager. No esters, alcohol, hops, or diacetyl. Extremely clean.

Appearance (2/3)
Brilliant rich copper color with a white head. A little more carbonation would improve the initial head, but it could use better persistence.

Flavor (16/20)
Beautiful malt character that is toasty and crisp without being caramel-laden or too rich. There is a hint of graininess that seems to be coming from a pilsner malt. The malt is crisp and balanced. There is no hop flavor, but their presence is felt in a bitterness that is medium-low with enough intensity to keep the beer crisp while allowing a lingering malt sweetness to persist through the finish.

Mouthfeel (3/5)
This beer is slightly undercarbonated leaving it with a somewhat full mouthfeel. Beer finishes relatively dry and perfectly to style. More carbonation would help make this an even more drinkable beer.

Overall Impression (9/10)
This is one of my favorite beers to brew and consume. Creating a clean, low-alcohol lager is a well-rewarded challenge. There is some nice malt complexity that is clean and crisp making it easy to both drink in quantity while also stimulating your palate. It is a beer that can you can dissect the flavors and aromas of one-by-one, or simply slam a boot of. Next time I brew, I’ll likely add some dextrin malt to improve the head persistence, slightly bump up the percentage of Vienna malt (while lessening the Munich II), and go back to my favorite lager yeast (WLP833, the Ayinger strain) which seems to attenuate a little bit better.

Total: (41/50) Excellent

Building The Pour Report’s Brooklyn Brewery – Pre Design

Seven months have passed since I moved cross country to Brooklyn. Life has a way of getting in the way of hobbies and my new brewery build was shifted to the back burner. Luckily, things are looking up. New equipment has been ordered and my first Brooklyn batch is only a couple weeks out.

Home brewery design has been on my mind a lot. Sizing components, designing wort transfer processes, handling the logistics of boiling on a puny stove and thinking about the items I’d change from my original brewery have been integral to my new brewery’s design. Among things that I wanted to implement in the new design:

  1. Pump transfers of liquid. No more lifting heavy (and hot) vessels.
  2. Use a plate chiller to increase cooling efficiency. Plumb vessels and pump to allow circulation back into kettle post-chill in order to utilize a whirlpool and minimize cold break from getting into the fermenter. It doesn’t appear many people are doing this, and I may abandon the process it if it proves to have little benefit.
  3. Create a tangential inlet into the kettle to allow for effective whirlpools.
  4. Use stainless steel quick disconnects throughout — because they’re cool.
  5. Plan for easy future integration of a RIMS tube w/ PID controller.
  6. Plan for easy future integration of a hop back.
  7. Build the brewery around the smaller volumes that fit the type of brewer I am.
  8. Use an electric heat element to jump start boils. Don’t electrocute myself.

Paramount to my brewery’s design is the volume of the various vessels. It is important to appropriately size my new brewery for the typical volumes and specific gravities I intend to use it for. By analyzing my own personal brewing interests, I’ve come up with the following typical brew lengths which can be used to size my equipment.

Typical Brew Lengths

  1. The Daily Drinker – 3 gallons (post boil) up to 1.080 original gravity.
    Easily packaged in a 3 gallon corny keg and served on draft. Typical brew length.
  2. Experimental Split Batches – 2.5 gallons (post boil) up to 1.120 original gravity.
    The perfect volume for experimentation. Easily split into secondary 1 gallon glass vessels for different treatments. Capable of producing very high gravity wort.
  3. Recipe Development Batches – 1.5 gallons (post boil) up to 1.120 original gravity.
    I get most of my enjoyment from the brewing process and learning about the implications recipe and process design have on the final batch. This batch size and gravity allows for frequent brewdays and flexibility.

Vessel Sizing

The vessels I’ve put into my brewery are designed around the gravity and volume of the typical brew lengths. Of the above scenarios, the ‘Experimental Split Batches’ has the highest gravity demands and thus dictates the mash tun sizing. The calculations showing the mash tun size requirements are below.

Constants Used for Calculations
70% efficiency (batch sparge)
60% efficiency (no sparge)

Mash Thickness: 1.25 qt. / pound water (batch sparge)
Mash Thickness: 2.25 qt. / pound water (no sparge)

35 Gravity Units per Pound of Malt
1 lb grain = 0.32 quarts (volume)
0.15 gallon / pound (grain water absorption)

Sizing Calculations

Experimental Split Batches:
2.5 Gallons @ 1.120 Original Gravity

2.5 x 120 = 300 Gravity Units

Mash Volume Calculation (Batch Sparge):
300 GUs  / 35 PPG / 0.7 (efficiency) = 12.24 lbs grain = 3.92 qt. = 0.98 gallons
3.825 gallons Strike Water @ 1.25 qt/lb

Total mash volume: 4.8 gallons

Mash Volume Calculation (No Sparge):
300 GUs  / 35 PPG / 0.6 (efficiency) = 14.28 lbs grain = 4.57 qt. = 1.14 gallons
8.03 gallons Strike Water @ 2.25 qt/lb

Total mash volume: 9.17 gallons
Kettle volume = 8.03 (strike volume) – 2.14 (grain absorption) – 0.5 (dead space) = 5.39 gallons

Mash Tun Size

Of the brew length typologies above, the ‘Experimental Split Batch’ (batch sparge) requires the largest volume mash tun (9.17 gallons). At the last NHC I won a 42 quart Polar Ware stainless steel kettle which should work well as a mash tun once it is insulated. It is stainless steel which will allows me to heat my strike water directly in the mashtun, and possibly do some direct fired mashes with the aid of a pump and stirring action. This is a large mash tun and will likely be problematic for extremely small batches. My plan is to design my hot liquor tank with valves, a false bottom, and insulation so that it may be used as an alternative mash tun for small batches.

Hot Liquor Tank Size

Strike water will be directly heated in the mashtun. When batch sparging, a separate 3-gallon vessel will be used to heat sparge water.

Kettle Size

My maximum batch size is 3 gallons. If these batches start with 3.5-4 gallons of volume  pre-boil, I should be able to use a 5-gallon boil kettle. For batches requiring very high gravities, I will likely run off more wort than can fit in this kettle and boil for long periods. In this case, I will likely split the boil into multiple vessels.

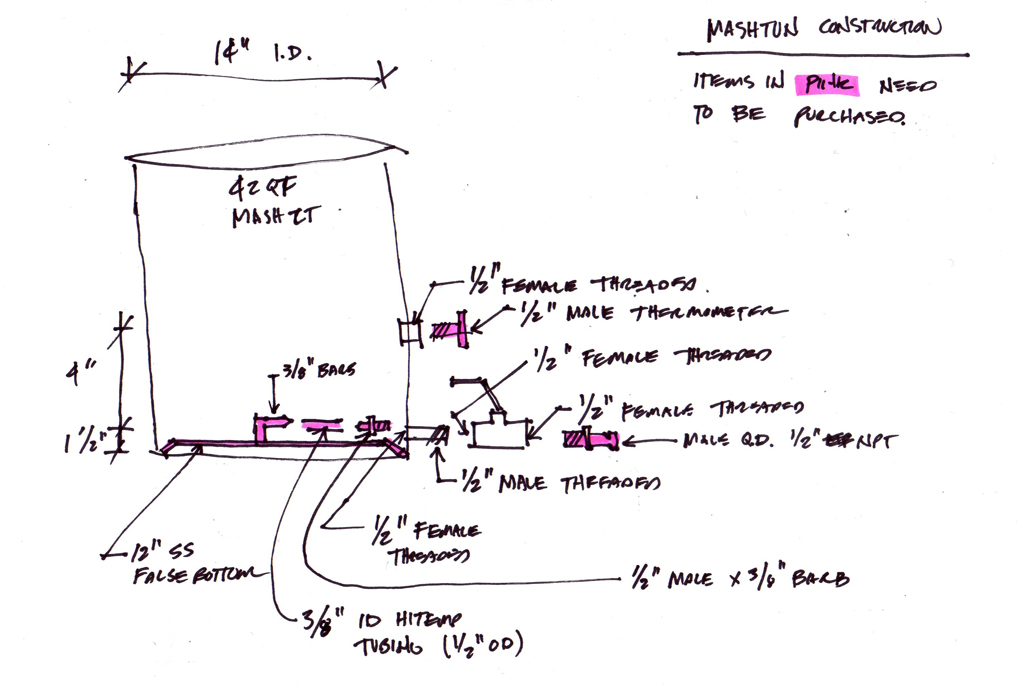
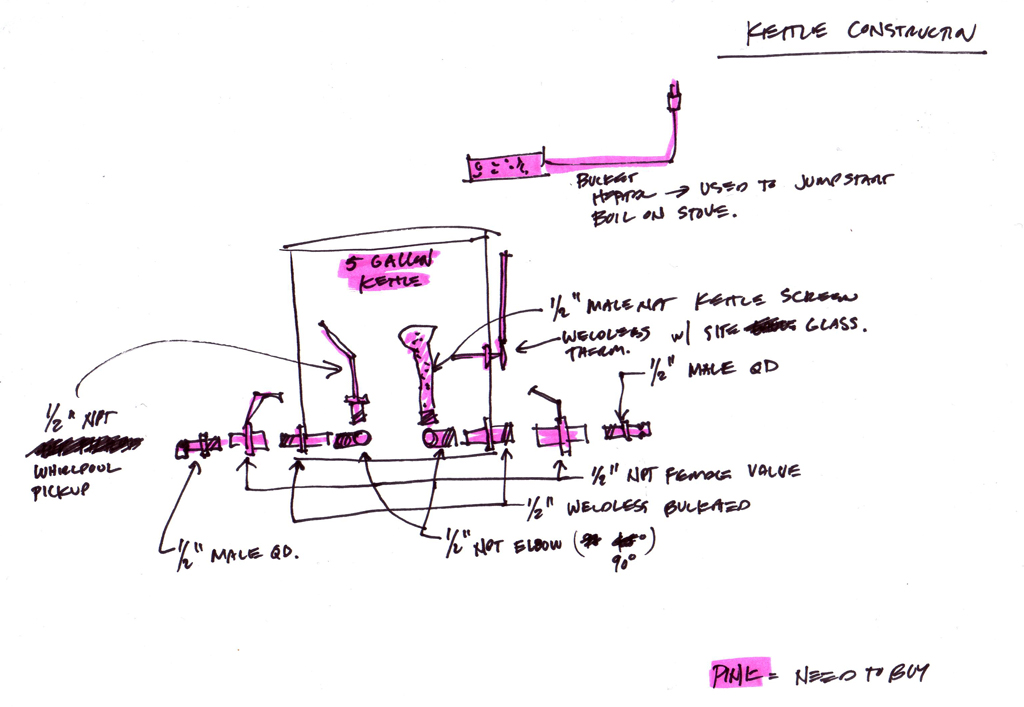
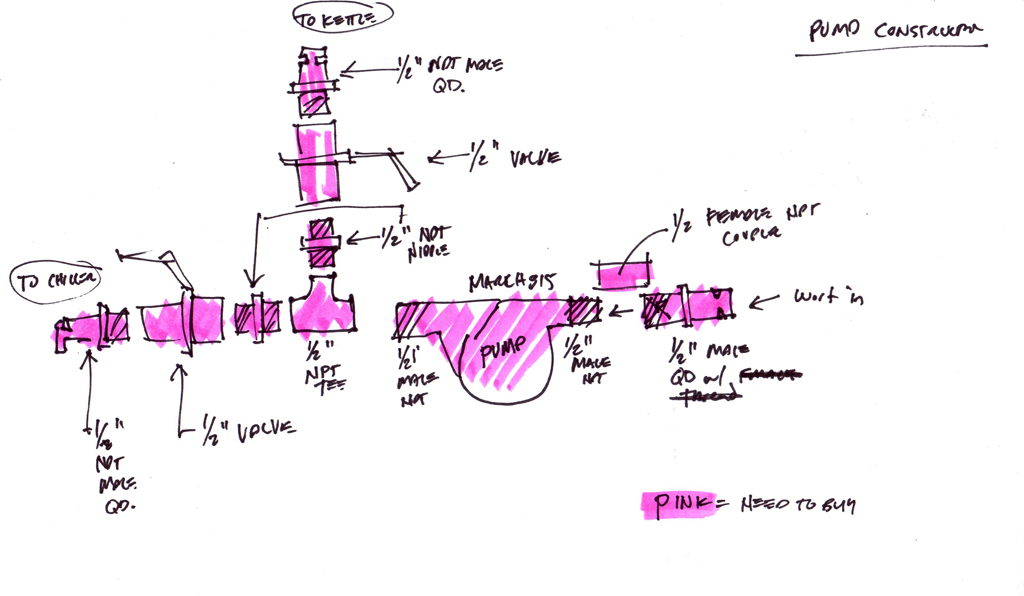
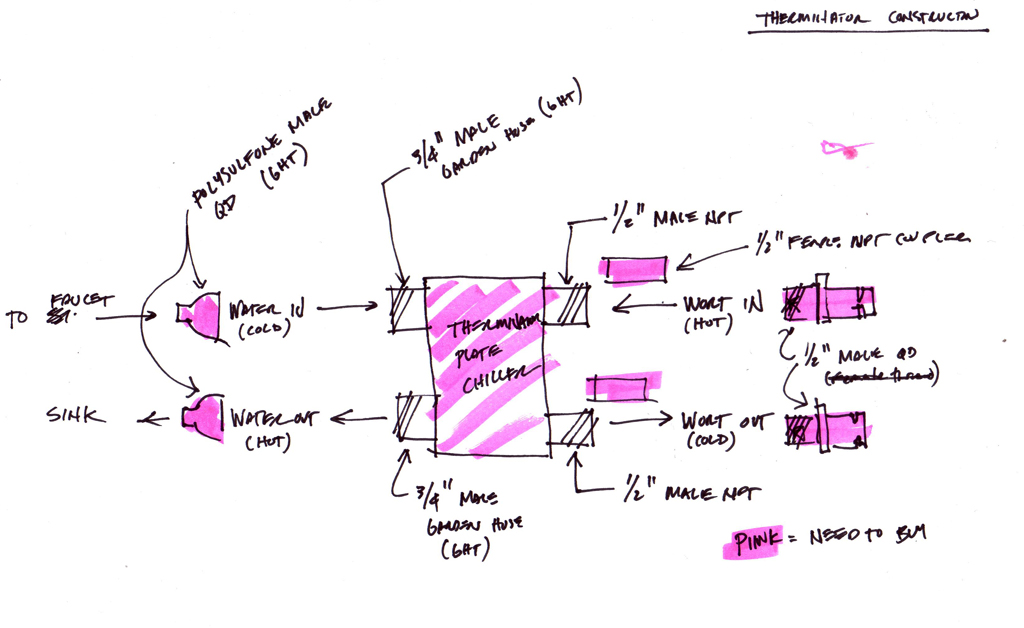
For my next post, I’ll photograph the brewery’s test run and breakdown the parts and processes designed into the brewery. In the meantime, check out the sketches of the brewery’s main components used to determine how everything connects and works together.

42 Quart Stainless Steel Mashtun. Features SS false bottom, ported thermometer, and SS quick disconnects.

Mash: 42 quart stainless steel mash tun. Features SS false bottom, ported thermometer, and stainless steel quick disconnects.

5-Gallon stainless steel kettle. Features two liquid ports (one out and one in for whirlpool functions), a sight glass with thermometer, and additional heat supply via a bucket heater.

Boil: 5-Gallon stainless steel kettle. Features two liquid ports (one ‘out’ and one ‘in’ for whirlpool functionality), a sight glass with thermometer, and supplemental heat source via a bucket heater.

March pump with stainless steel quick disconnects. There is a tee with valves allowing recirculating directly into kettle or through the plate chiller that is attached in series.

Wort Transfer: March pump with stainless steel quick disconnects. There is a tee with valves allowing for recirculation directly into kettle or through the plate chiller that is attached in series.

Plate chiller with appropriate stainless steel quick disconnect fittings.

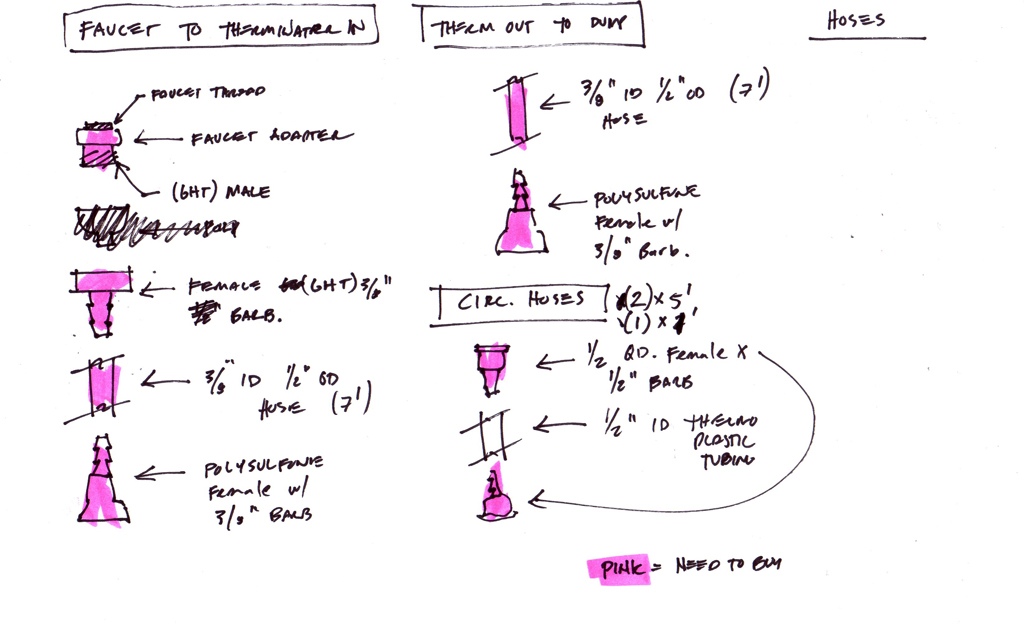
Chill: Plate chiller with appropriate stainless steel quick disconnect fittings. Polysulfone quick discounts connect the chiller to my cold water source (my kitchen faucet).

All hoses are designed with appropriate food safe thermo-plastics and stainless steel quick disconnects where possible.

All hoses are designed with appropriate food safe thermo-plastics and stainless steel quick disconnects where possible.

Homebrewing Will Not Save You Money…

The Satisfying Rhythm of Yeast Blowoff

The Satisfying Rhythm of Yeast Blowoff

…and that’s okay. Seriously. It is kind of mind boggling the number of times I’ve heard people claim that homebrewing will save you money. I feel like these people are somehow missing the point of the hobby and taking a simplistic look at the actual costs of brewing. It’s one thing to advocate for the hobby (which is why I write this blog), but you need to present realistic expectations for new brewers. If trying to save money is why you’re homebrewing, get out now. There are plenty of other (and better) reasons to homebrew.

Case Study in Brewing Costs

Let’s look at the basic economics of making a 5-gallon extract batch of beer of average gravity and hop levels on the simplest (cheapest, lowest quality) system out there that does not include kegging, temperature control, liquid yeasts and starters, wort cooling devices, and assumes you are using recycled bottles for packaging. I am using an extract beer for the model because typical statements about the cost of homebrewing are targeting new brewers who will likely start with extracts.

The following will make 5 gallons of 1.054 beer at 50 or so IBUs that should ferment out to 5.3% ABV. Let’s call it a simple American Pale Ale (not unlike Sierra Nevada Pale Ale). Prices are quoted from Northern Brewer (one of the cheapest shops around) and do not include tax or shipping. This model makes a lot of assumptions, one of which is that you care about the quality of the beer you’re going to make. You could easily throw table sugar, water, and bread yeast together to make alcohol, which would get you drunk. It also assumes that you want craft beer. You won’t be able to brew a Miller Lite clone cheaper than you can buy it in the store. This recipe would produce something comparable to a lot of craft beers out there, especially if care is taken along the way.

Ingredients:

  • 5 lbs dried extract – $19.99
  • 1 lb steeping grains – $1.75
  • 1 oz high alpha bittering hops – $1.99
  • 2 oz aroma hops – $3.98
  • 1 pack dry yeast – $3.29 (Safeale US-05)

Related Consumables:

  • Energy – $2
  • Water – $1
  • Sanitizer – $2
  • Cleaners – $2
  • Caps – $1
  • Mesh Bag – $0.50

Equipment:

  • Basic Starter Kit including a fermenter – $79.99
  • 5 Gallon Pot – $34.99

Equipment is the hardest cost to quantify due to the mind-boggling options out there and the time period which the costs should be spread over. Because of this, it is often altogether overlooked. What I’ve specified above is the most basic kit you can get. You’ll likely add (a lot) more stuff to this to increase the quality of the beer and decrease the amount of labor involved. For the sake of simplicity we won’t account for this. We’ll divide the equipment cost over 12 batches because you’ll likely either quit the hobby or move on to more advanced brewing requiring more advanced equipment by the time you do 12 or so extract batches. This leads to an equipment cost of $9.58 per batch.

Totals Costs:

  • Ingredients: $31
  • Consumables: $8.50
  • Equipment: $9.58

Total: $49.08

Most brewers yield about 48 – 12oz bottles of beer from a 5-gallon batch. The loss in volume is due to racking, spillage, trub loss, hop absorption, etc. That is a per bottle cost of $1.02 if you’re really pinching pennies and being careful along the way.

A 12-pack of Sierra Nevada (one of the cheapest and best American Pale Ales out there) will run most people in most areas about $11.99 or about $1 per bottle.

If you are trying to clone Sierra Nevada Pale Ale, your homebrew will cost about 2 cents more per bottle than buying the genuine product at the store. This doesn’t take into account the fact that your time is worth something (an extract batch will take 4-6 hours of your time when you take into account packaging) or the fact that you’ll likely want to use liquid yeast and make upgrades over the simplest setup out there.

If I’m hell bent on saving money, how can I?

  • Move to all-grain brewing and buy in bulk. Raw grain is much cheaper than extract.
  • Make sure your all-grain setup is very basic. Try brew-in-a-bag methods. Think hard about each upgrade and decide if it is worth the added cost.
  • Buy your hops in bulk.
  • Harvest and re-use your yeast.
  • Lower your expectations. Brewing great beer requires techniques to appropriately produce and pitch the proper amount of yeast as well as precision in controlling your fermentation temperatures. These both cost money and are not something I would recommend skimping on if you’re trying to brew the best beer you can.

Even doing all of the above, you’re still going to have a tough time making it pencil out when you take into account equipment costs (as well as the desire to brew the best beer possible) and not simply something that will give you a buzz.

At the end of the day, brewing your own beer is awesome. You can create amazing beers that mimic those commercially available or let your imagination run wild and dream up your own creations. I brew for the pure satisfaction of crafting something delicious with my own two hands. Brew for these reasons not because you’re trying to save money.

Are you a brewer saving money making your own beer? I’d love to hear your comments below! Please tell us what you’re doing to make beer cheaper than what can be purchased commercially.